Assemblr Edu Guide
Visit Assemblr Edu
English
English
  • Hello!
  • Getting Started on Assemblr Edu
    • What is Assemblr Edu?
    • Tech Check!
    • Signing Up in Assemblr EDU
    • Signing In to Assemblr EDU
    • Email Verification
    • Account Login Limitation
  • Assemblr EDU Main Feature
    • Topics
    • Edu Kits
    • Editor
    • Classroom
  • Creation Guideline
    • Warm Up Activity
    • Core Activity
    • Student's Activity
  • Introduction to 3D/AR Editor
    • 3D/AR Creator Dashboard
    • Custom Marker Dashboard
  • Assemblr Edu Main Menu
    • Navigation Bar
    • Project Dashboard
    • AR Markers Dashboard
    • Account Dashboard
    • Marketplace Page
    • Discover Page
  • Create Projects
    • Create Project Using Super Simple Editor
    • Create Project Using Default Editor
  • Assemblr Edu Editor
    • Introduction to Editor
    • Super Simple Editor
    • On-Screen Display Settings
    • Multi-Select Objects
    • Change Background Color
    • Insert 3D & 2D Objects
    • Insert Texts & Annotations
    • Insert Videos & Audio
    • Transform Tools on Editor
      • How to Move Objects
      • How to Rotate Objects
      • How to Scale Objects
      • How to Duplicate Objects
      • How to Mirror Objects
      • How to Copy Objects to Another Scene
      • How to Delete Objects
      • How to Edit Objects on the Transform Panel
      • How to Change Objects on the Transform Panel
    • Scene Feature
      • How to Add, Duplicate, and Remove Scenes
      • How to Set Scene Camera
    • Interactivity Feature
      • Animate (Move, Rotate, Scale, Animation)
      • Visibility (Hide & Show)
      • Jump Up (Switch Scene & Open URL)
      • Media (Video Control & Sound Effect)
  • Custom AR Markers
    • What Is Custom AR Marker?
    • How to Insert Custom AR Markers from the Editor
    • How to Insert Custom AR Markers from AR Marker Dashboard
    • How to Purchase Custom AR Markers
  • Preview & Publish Projects
    • How to Preview Your Project
    • How to Publish Your Project
  • Share Projects
    • Share Project's Link
    • Share Project's Embed Code
    • Share AR Markers
    • Embed in Canva
  • View Projects
    • View on Web Browser
    • View on Assemblr Edu App
  • Assemblr Marketplace
    • What Is Assemblr Marketplace?
  • Plans & Pricing
    • Assemblr Edu Subscription Plans
    • BLR Coin
  • Redeem Vouchers
    • How to Redeem Vouchers
Powered by GitBook
On this page
  • What Is Interactivity?
  • Interactivity Pane
  • Pro Tip
  • How to Create Projects With Interactivity
  • Pro Tip
  1. Assemblr Edu Editor

Interactivity Feature

PreviousHow to Set Scene CameraNextAnimate (Move, Rotate, Scale, Animation)

Last updated 4 months ago

What Is Interactivity?

Interactivity allows you to add interactive animation effects to your objects, so your creation will appear much more impressive.

All you need is to set the trigger and target objects, choose the interactive animation type that you want, and you're good to go.

Interactivity Pane

You can see all your interactivity actions on the Interactivity Pane. It’s an all-in-one pane, and you can arrange a few quick things here!

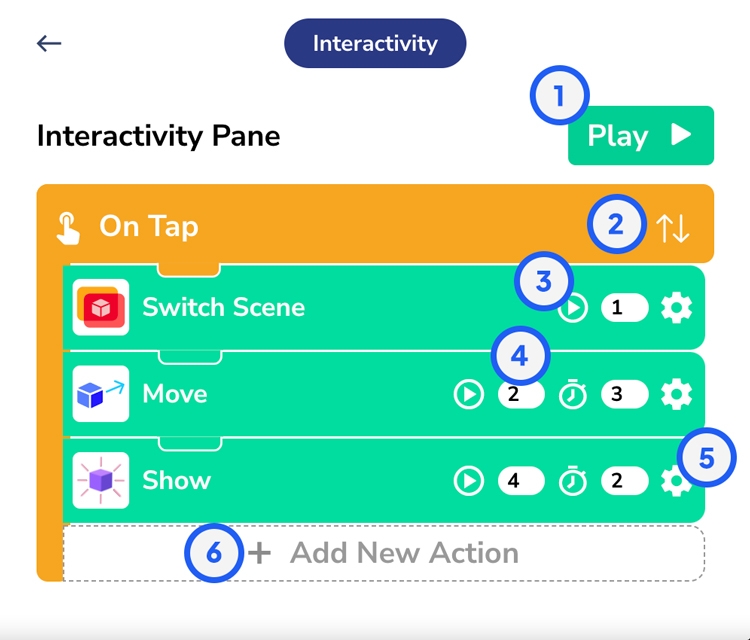
  1. Play the preview of your interactivity action.

  2. Sort your interactivity actions based on their start time.

  3. Insert the start time of your interactivity action.

  4. Insert the duration of your interactivity action.

  5. Head to the Interactivity Settings pane.

  6. Add new interactivity actions.

Pro Tip

On your trigger object, you can add more than one interactivity action! However, make sure that they’re not too much, so they won’t overlap and will be more seamless.

How to Create Projects With Interactivity

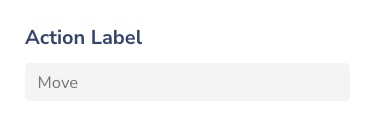
On the settings, you can start with naming your interactivity actions. This will be very helpful to differentiate one action among the other ones.

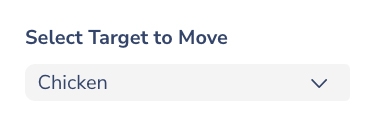
To make more mind blowing interactivity, you can decide the trigger and target object as well. The trigger and target can either be the same or different objects. It’s up to your liking!

The logic is: when you click or tap on the trigger object, it will trigger the target object to act based on the interactivity action you add.

Every interactivity action also comes with the advanced settings. You can set up the start time, duration, and easing of your interactivity; except for the Open URL action.

Pro Tip

Oftentimes, start time and duration play a huge role for your interactivity actions. Make sure that you set them right according to your needs, so the animations won’t overlap with each other.

  1. Determine the time your target object starts to react after you click or tap on it.

  2. Determine how long your target object will react.

  3. Specify the motion of your target object, so at some points, it may accelerate or decelerate.